Integration with third-party systems like Xero is available for subscribers on a paid plan. This service allows you to post payroll transactions into Xero for bookkeeping purposes.
If you are not familiar with charts of accounts or general ledger codes. If you have not already set up your accounts in Xero and need some help on what you will need.
Setup Xero integration
To get started, login to your payroll account and go to SETTINGS -> ADD-ONS.
Enable integration with Xero
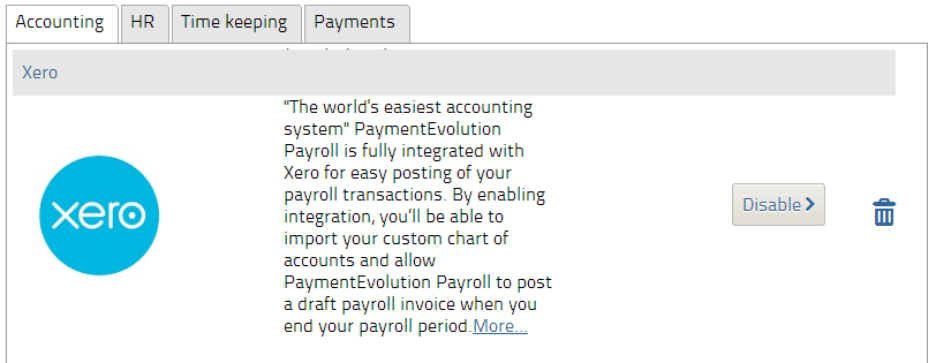
Xero integration is now enabled but you should follow the next steps (you only need to do this once)
Navigate to SETTINGS - PAYROLL OPTIONS - G/L tab
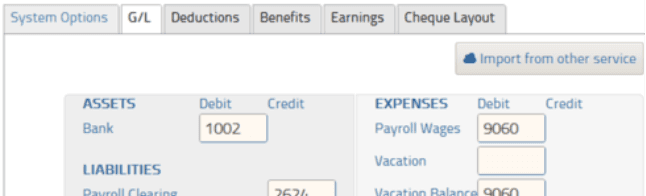
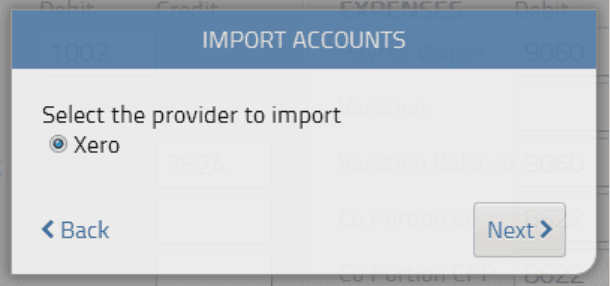
Click on the IMPORT FROM OTHER SERVICE button. The next screen will display a list of third-party integration partners. Select Xero.
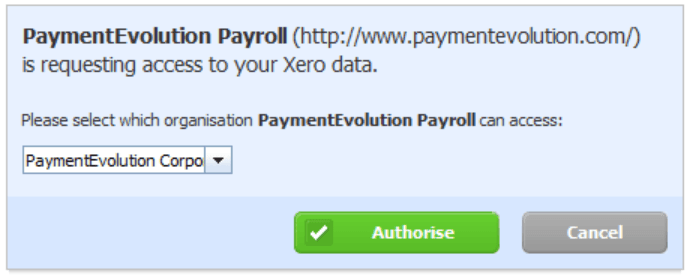
You will now be forwarded to the Xero site to authenticate and provide permission for Payroll to post transactions to your account. Login with your Xero credentials
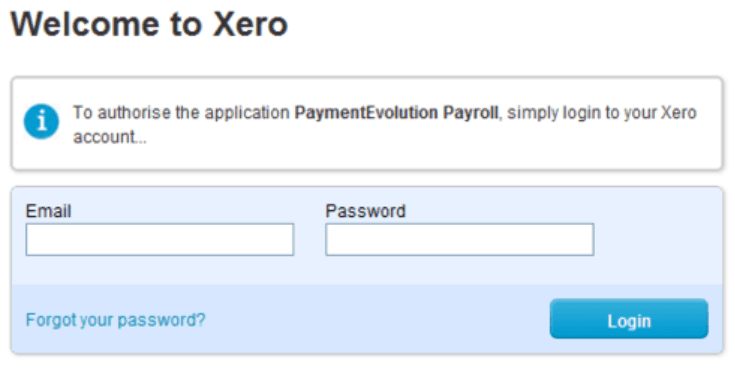
Next, Xero will confirm the request and ask you to authorize Payroll to post transactions to your account.
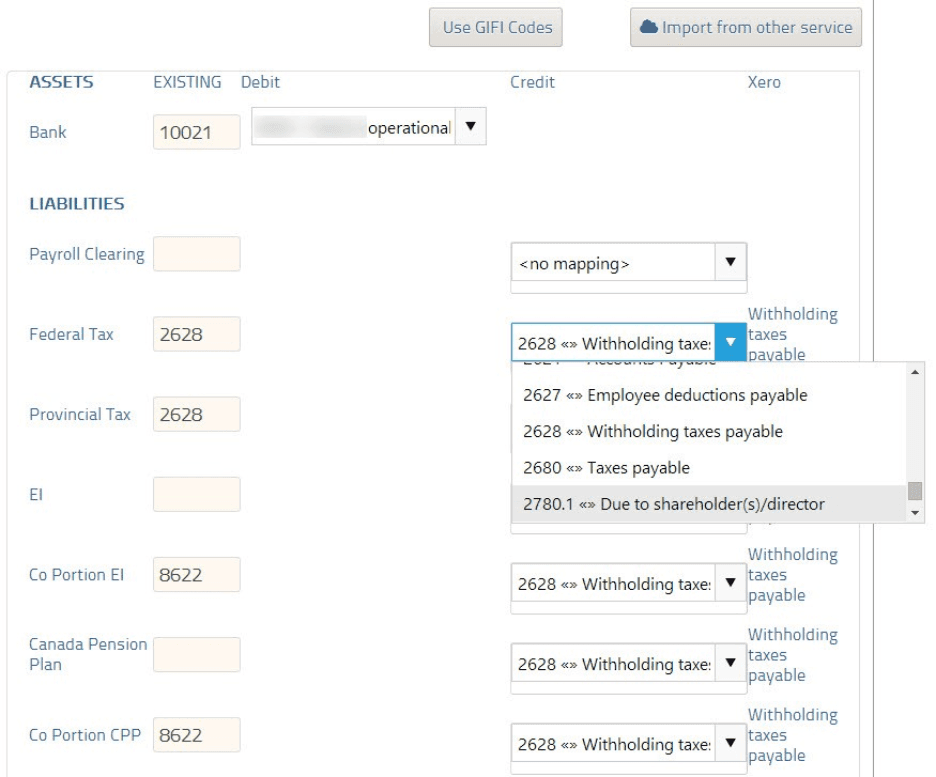
Once authorized, you'll be directed back to the Payroll site and have the opportunity to synchronize your Xero chart of accounts with the Payroll GL. Use the dropdown lists to match the fields to the appropriate accounts imported from Xero. **PLEASE NOTE YOU MUST MAP ALL FIELDS, EVEN IF YOU DON'T USE THESE ACCOUNTS, TO AVOID ERRORS.
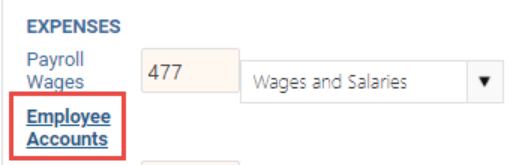
If you have added GL departments in the employee profiles, please click EMPLOYEE ACCOUNTS under wages to search and map those.
If you have already mapped your accounts but need to add these employee accounts to your mapping, please click "Import From Other Service" to bring up this button.
Your GL import and synchronization are now complete. You can now process a pay run on the Payroll site. To do so, click on RUN PAYROLL. Run your payroll as you normally would.
Notice
Xero integrated accounts require a PIN to login and finalize payroll or B2B payments. You will be prompted to enter a 6-digit numeric PIN when you visit your dashboard or upon your next login. You will need this each time you log in.
Importing payroll transactions into Xero
When you are ready to import your transactions into Xero, either click ACTIONS -> END OF PERIOD or start a new payrun. The system will prompt you to send your recent transactions to Xero
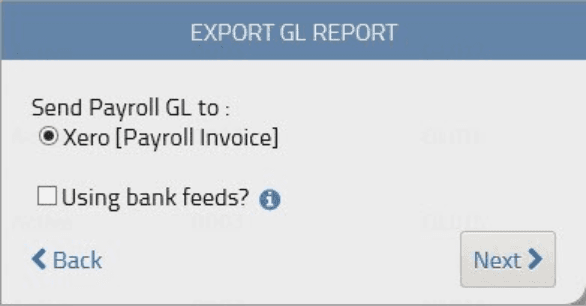
Note: If you receive automated bank transaction feeds into Xero and want to reconcile directly against your bank account, then ensure Using banks feeds is checked.
This ensures that draft invoices sent to Xero are payable (i.e. they are not zero-balance invoices that are typically used if you have a payroll clearing account)
Payroll will send Xero any transactions you've done since you've last closed your payroll period. Older transactions in periods that you've already closed can be imported via REPORTS -> GL REPORTS. Just click the export button beside the report you wish to export into Xero.
Now the next time you log into Xero you'll see a draft invoice from Payroll.
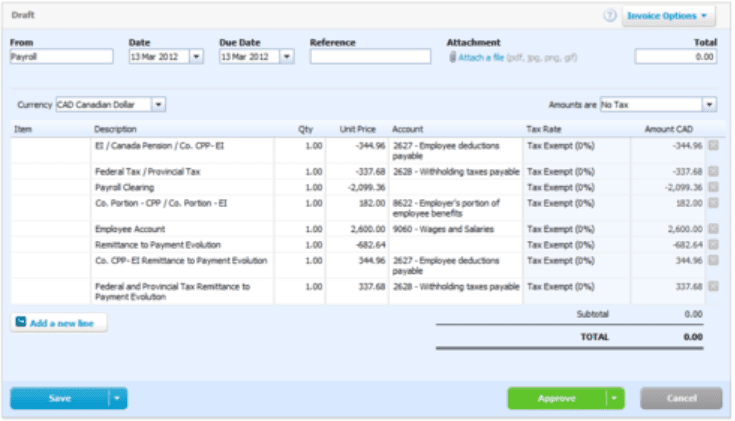
Make note of the line items in the draft invoice. We'll match the line items to the chart of accounts given previously. Talk to your accountant about the next steps
If you selected Using bank feeds during the export then you will see a payable draft invoice - an invoice with a balance that needs to be paid. Once your bank feeds come in, reconcile these transactions against the approved payroll invoice.
If you did not select Using bank feeds then the invoice will be a _zero-balance _invoice. This zero-balance invoice will record payroll transactions against a payroll clearing account as detailed in the draft invoice.
Talk to your accountant to determine if you should be using a payroll clearing account or direct bank reconciliation.
Correcting a "payroll clearing" account invoice to use direct bank reconciliation
If you exported your transactions to Xero and forgot to select Using bank feeds) you will need to remove a few items from the draft invoice: "Payroll Clearing" and "Remittance to Payroll". Note: the remittance amounts may be split into multiple line items - be sure to remove any NEGATIVE amount related to CPP, EI, Federal Tax and Provincial TAX. Just click the "X" on the right of the line item to remove that item from the draft invoice. This has the net effect of making the invoice "payable". Xero will record it as such and next time you reconcile with your bank statement, you will be able to match the invoice against the debits in your bank account.

NOTE: you may have more than 2 entries to remove. Delete any NEGATIVE line items related to payroll wages, CPP, EI or tax.
If you will not be using bank reconciliation for payroll transactions, keep the invoice as is. This zero-balance invoice will record payroll transactions against a payroll clearing account as detailed in the draft invoice.
Ensure all the line items are correctly matched to the accounts in Xero and approve your invoice. That's it! You've successfully imported your payroll transactions into Xero Online Accounting.
Some things to note:
Transactions can only be posted to Xero after you close your payroll period
You need to be on a paid plan to access this integration feature
Xero's existing payroll module does not calculate payroll deductions, taxes, or any other custom benefits. You should use the Payroll site to perform your payroll runs
Authorization to post transactions to your Xero account must be done with credentials of a "standard user" in the Xero system or higher. Read-only users cannot authorize Payroll data to be sent to Xero.
Troubleshooting & FAQs
Trouble connecting to Xero?
If you are having issues connecting to Xero, your connection might need to be re-established. Please log into your account, go to add-ons and delete the Xero integration. Re-enable the add-on and follow the steps above to ensure your chart of accounts are mapped properly.
My GL reports aren’t being sent over to my accounting platform.
If you are having issues connecting to your accounting system, your connection might need to be re-established.
Start by logging in to your accounting platform. Then, try searching for PaymentEvolution in your Connected Apps. Enable the connection, and then logout of your accounting platform. Note – if this is not available, skip this step.
Login to PaymentEvolution, go to Settings > Add Ons and delete (trash can icon) the connection with your accounting platform.
Re-enable the add-on and follow the steps above to ensure your chart of accounts are mapped properly. Ensure ALL accounts are mapped, including those that you won’t use.
Check for special characters while mapping (dashes, accents, etc.) as this can disrupt the connection or prevent the report from being imported. If you need to remove the characters, do so from within your Chart of Accounts in your accounting platform.
Related Tasks
Keywords: Accounting Add-on, Xero Accounting, Accounting Software, Integrations, Xero Integration
396
Can't find what you are looking for? We can take a more direct look to help resolve your matter — Create Case or Contact Us